Sunday, February 20, 2011

A new look and a lighting update

Hey all! I've made some changes around the ol' blog, switching up the header and adding some pages for easy navigating. Let me know what you think! So far there's a page about the blog and us, and I'll soon be adding a "house tour" tab so you can get a better idea of the many, many transformations that this house has undergone all in one place! Check back for that soon.


We've slowly but surely been picking away at some projects in the guest bedroom. As of now, it's still a storage space. One of the biggest issues we were facing is lighting in the room. There was one very outdated ceiling fixture when we bought the house, but since the room was renovated in June it has just looked like this:

Photobucket

Not very welcoming. Gotta love having exposed wires in your ceiling.

It's tough to get projects done in here with just a couple of table lamps. We knew we needed a solution, but the placement of the fixture, wayyy off on the side of the room against the wall, made for a tricky situation.

We wanted a way to bounce a lot of light around the room, and we knew that just one light wouldn't help brighten up the rest of the space. Enter the solution: track lighting!

Photobucket

This was not an easy fixture to install, and took quite some time and frustration. Installing each of those supports while keeping the heavy tube level was a task. The result, though, is fantastic! The room is so bright now and having five movable fixtures means that we can direct light in any direction we need to.

Photobucket

Photobucket

I love the versatility that we'll have when we actually start using this room!

With the spotlights, I feel like this wall deserves some really interesting artwork now, but I'm not sure what will live here yet. I'm thinking that the dresser will need to move as well. We hope to someday put either a daybed or pullout couch in this room so we have the option for guests to stay over.

We're working on finishing up a long bookcase that Branden built from some scrap wood we had from another project. Once finished it will give us ample storage space in here. I can't wait to show you how it turns out!

Tuesday, February 15, 2011

Total Transformation: The Master Bedroom

Well, I promised more total transformation posts, and here's another one already!

I've been making little tweaks to the master bedroom lately in an effort to make the room feel a little more finished. There's still some more to do before it feels "complete", but I thought this would be a good time to take a look at this room and how far it's come!

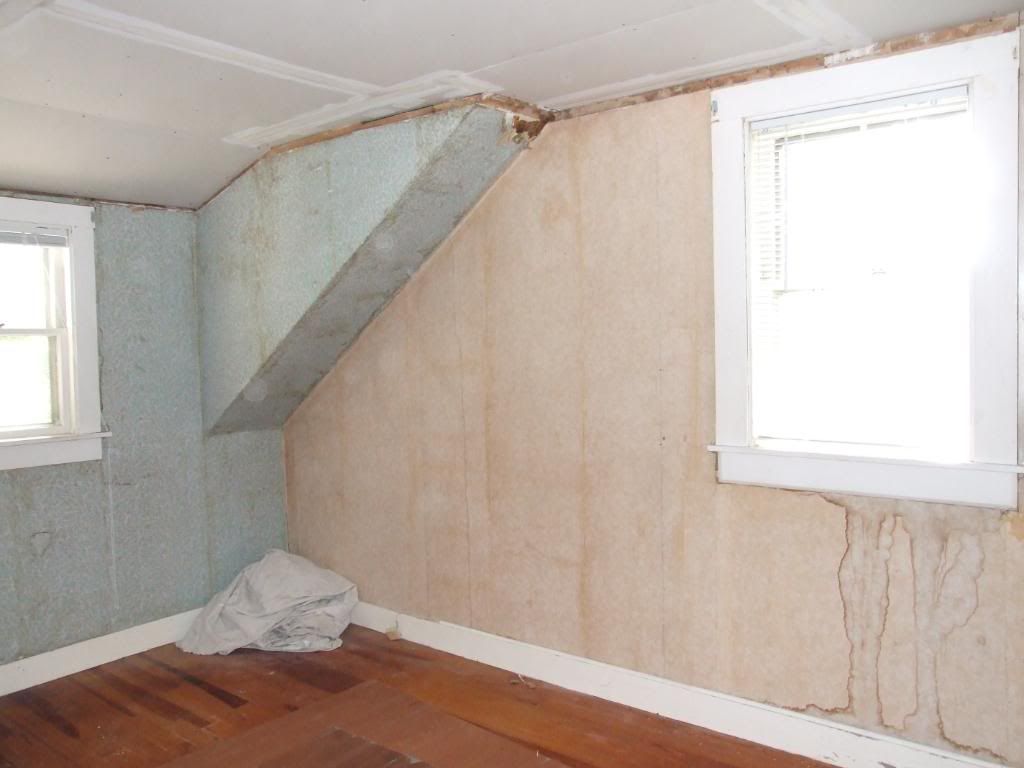
As with the rest of the house, this room was covered in layer upon layer of corroding wallpaper, as well as laminate paneling on one wall and those strange mystery panels on the ceiling. Consider this your warning that the pictures you're about to see are kind of terrifying!

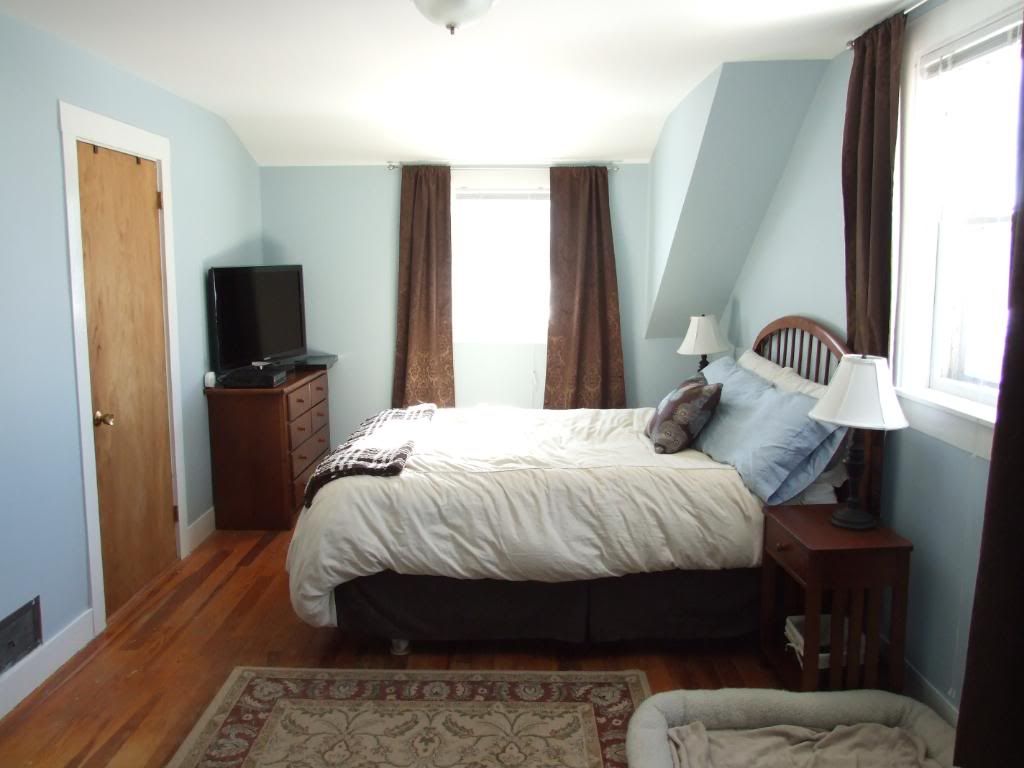
Here is the room after we closed on the house in June:
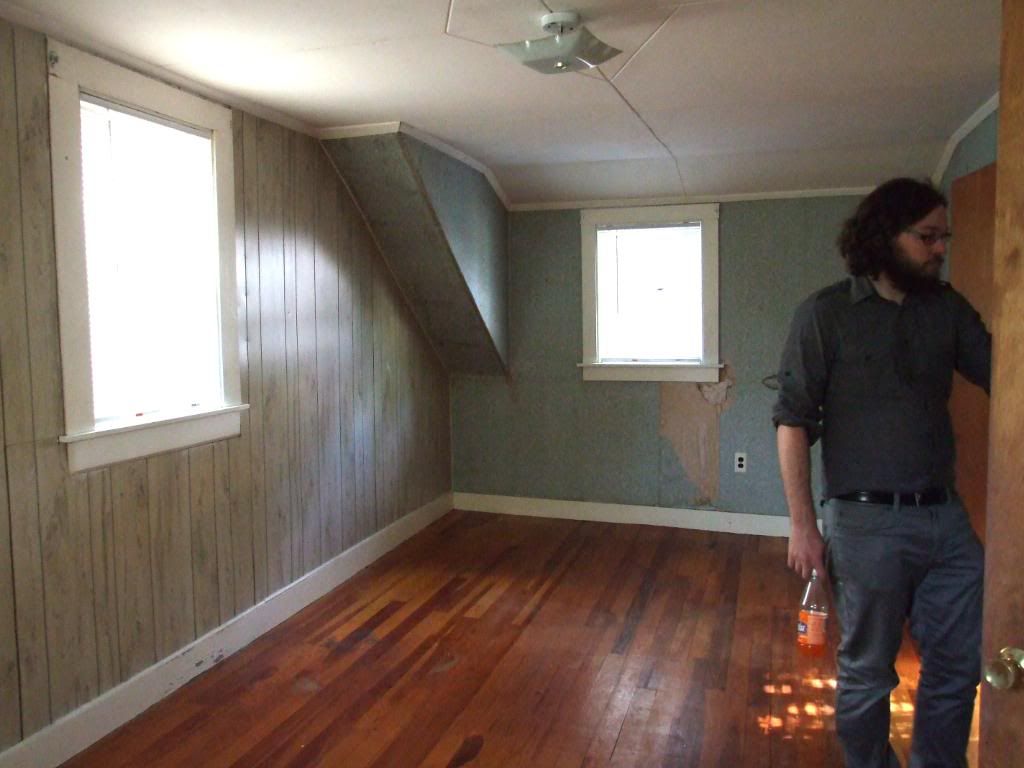
Photobucket

Photobucket

Scaaaary!
(And I don't just mean Branden's wild man beard... though that was scary too.)

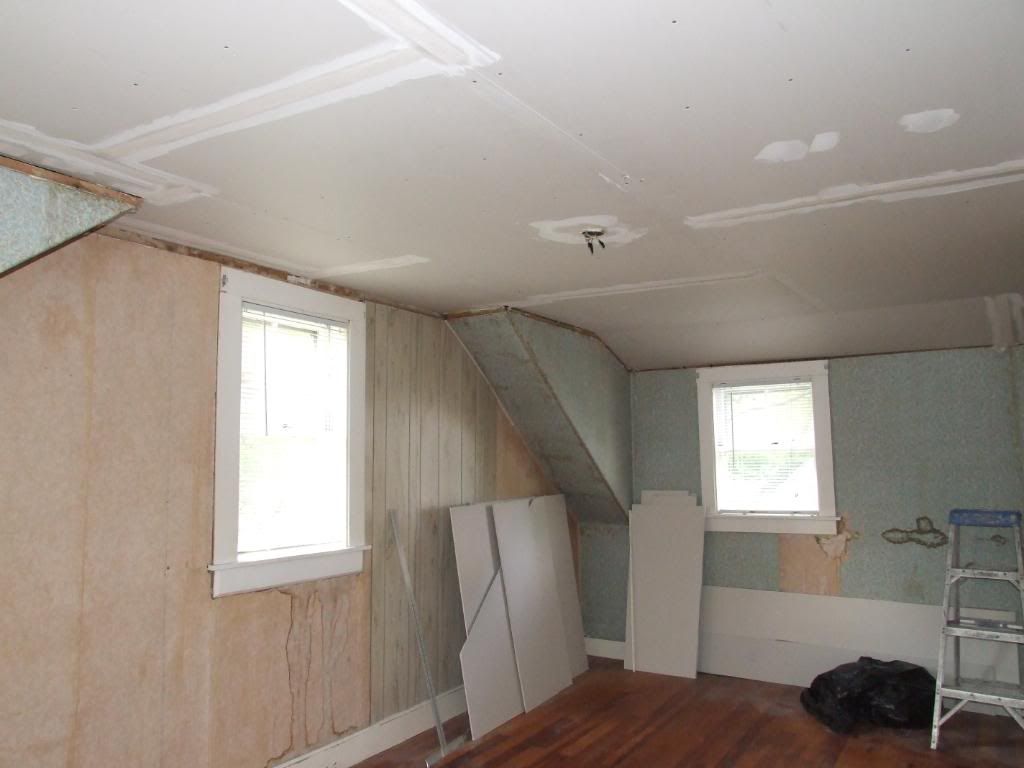
The first thing we did was pull down the ceiling panels and put up new, flat sheetrock.

Photobucket

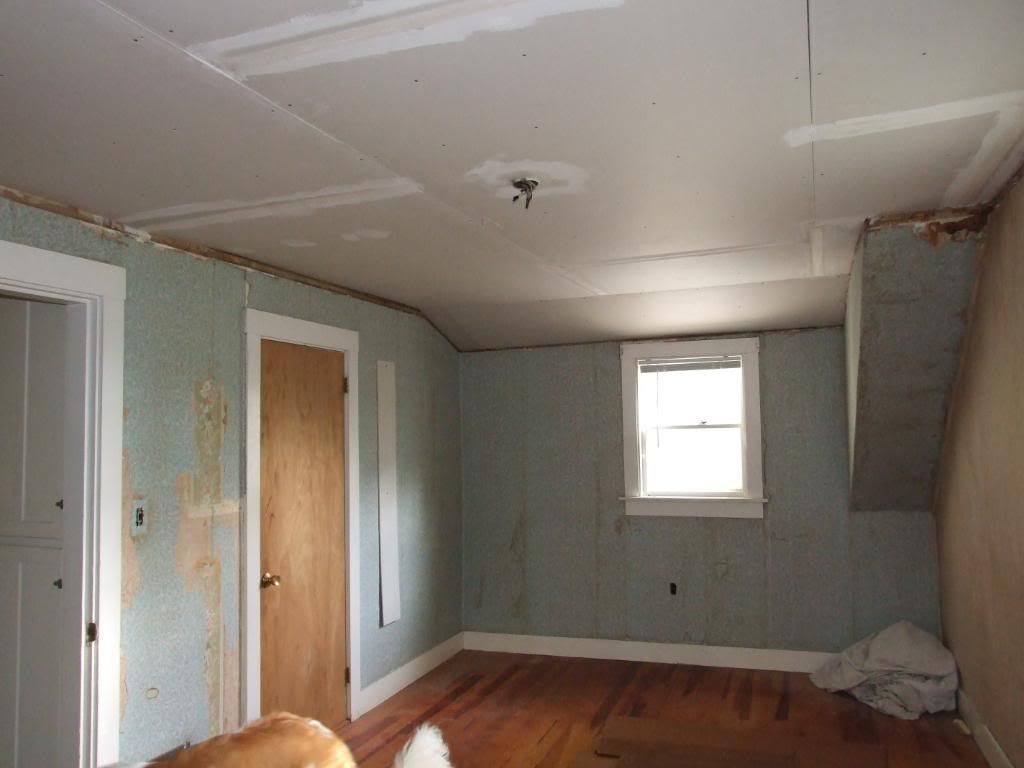
Then the laminate paneling (faux-birch... fancy) was removed.

Photobucket

You can see there's still a little bit left on there in the photo above. And of course there was wallpaper underneath that paneling. Of course.

After the paneling was down, the new drywall started to go up.

Photobucket


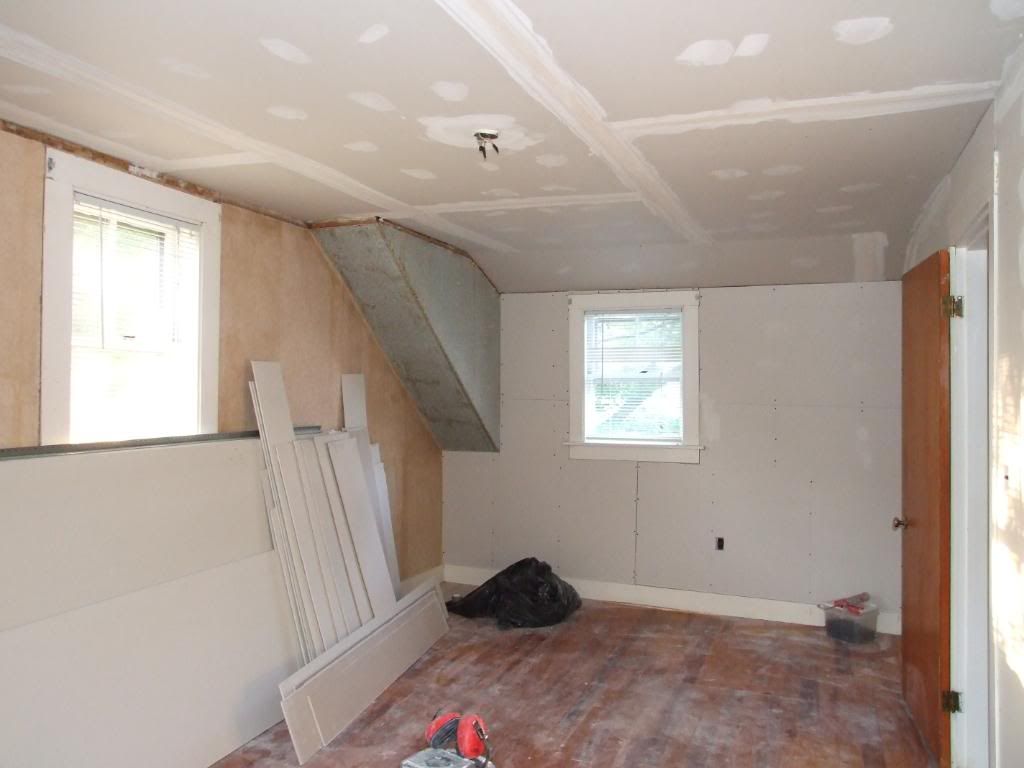
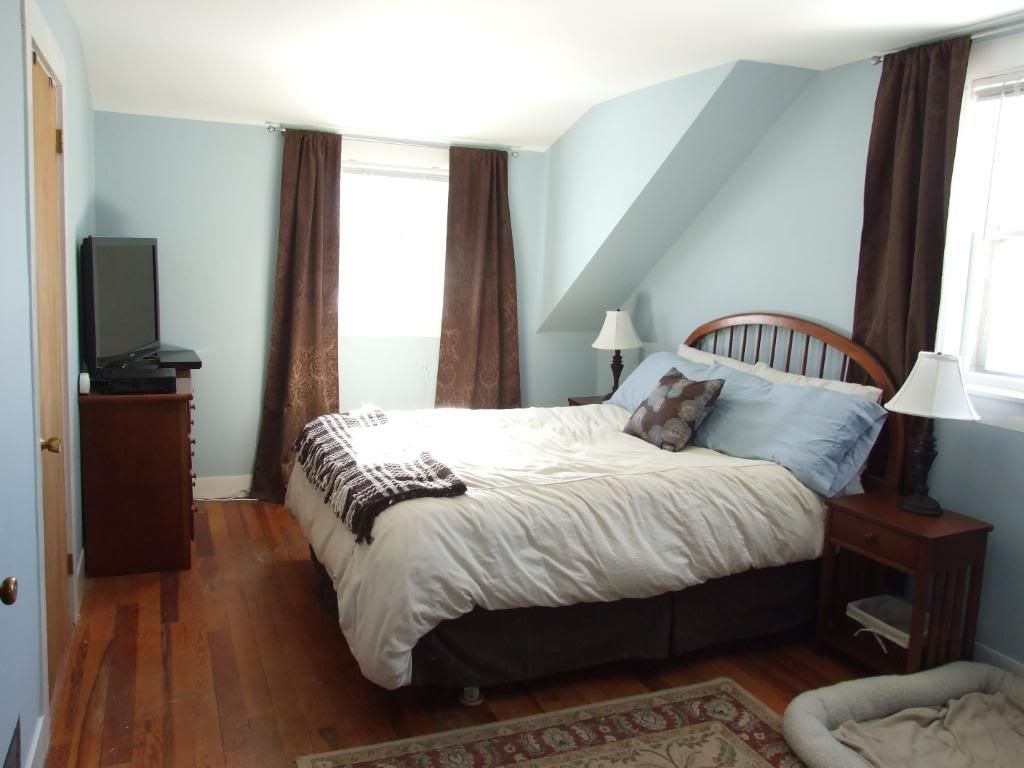
This was the last room finished when we moved in. We actually slept in our guest bedroom for the first week or so after we moved in while our contractor finished this room up. After lots of mudding, sanding, priming, and painting, it was finished and I absolutely love how cozy and inviting this room is now!

Here is what we started with...

Photobucket

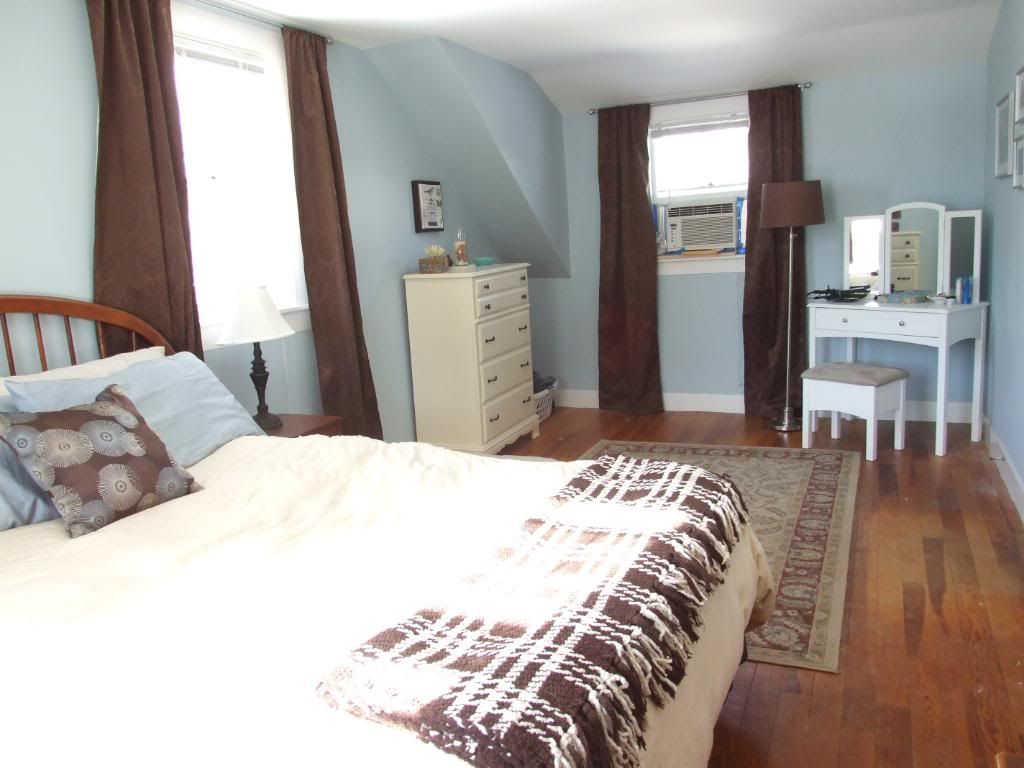
...and here's the room today:

Photobucket

Photobucket

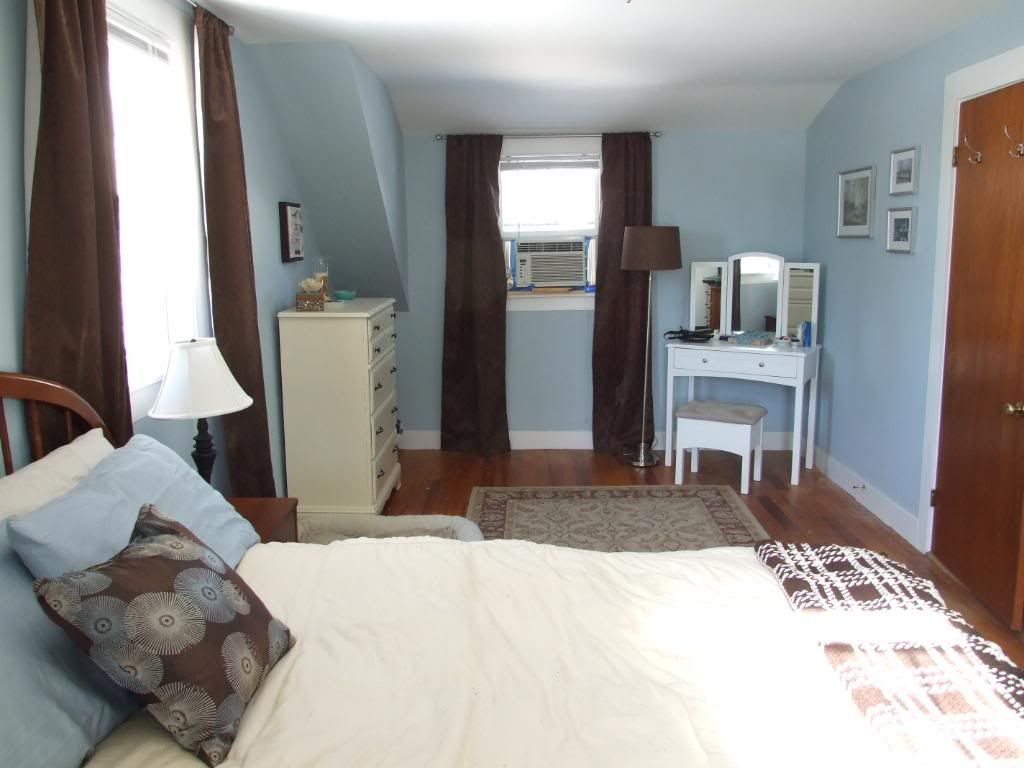
My absolute favorite part of the room is my little vanity nook...

Photobucket

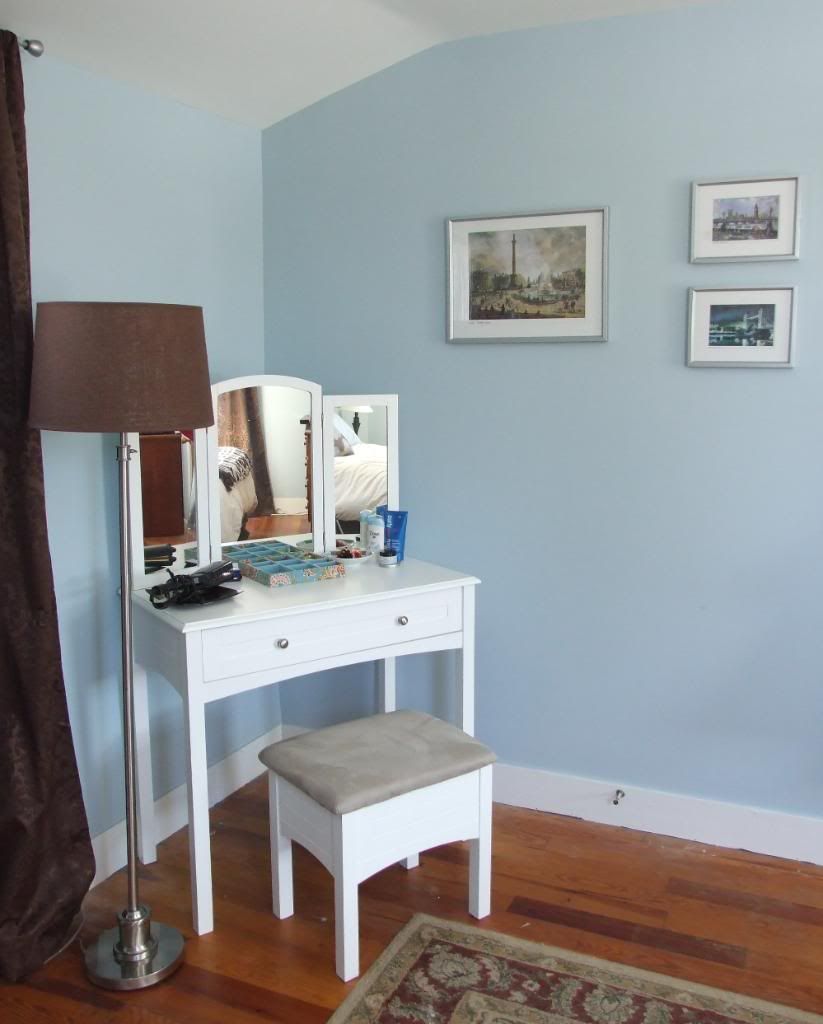
The prints on the wall are from London. When I lived there, there was a shop outside of my tube station (Baker Street... home of Sherlock Holmes!) that sold these prints of all different London landmarks. They were completely touristy, but on one of my last days there I decided to buy a few to bring home. Love them.

Photobucket

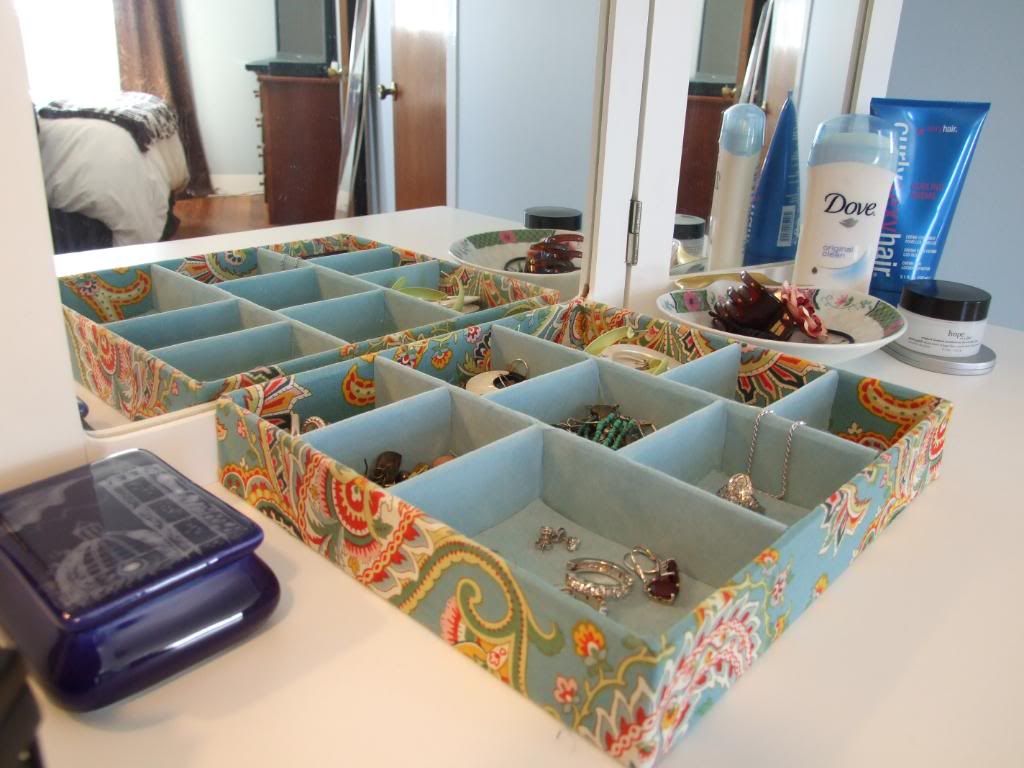
My vanity table has all of my jewels (having a jeweler for a boyfriend is a lovely thing...) and some keepsakes, like the blue box that my sister brought me home from Venice and a shell-shaped dish from my grandmother. I absolutely love sitting here each morning--it's nice to feel pampered in your own home!

Across from the vanity is this dresser that I've had since I was very little.

Photobucket

It used to be an ivory color with gold details (very 1980s), and was also covered in stickers. Gotta love little kids. When I was in college I spray painted it (very poorly) purple with silver drawers. Now it's gotten yet another makeover, with cream paint and new, simple hardware!

Photobucket

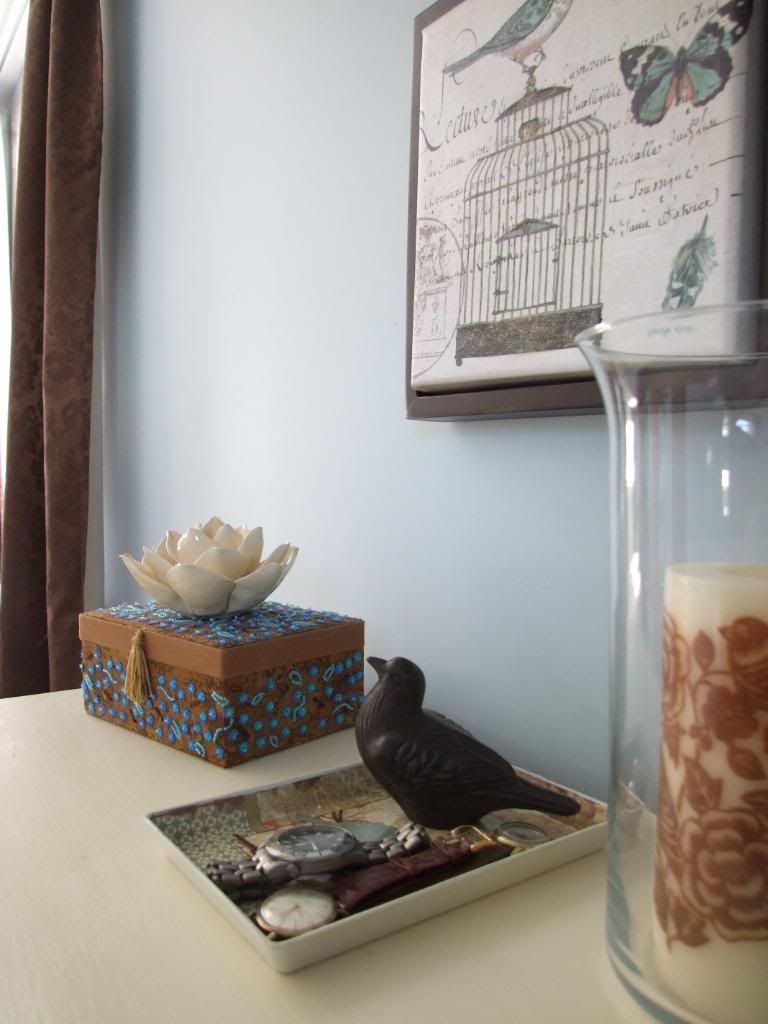
There's a bit of a bird theme going on here, but I like it! I picked up this little tray for Branden to keep his watches in one safe place, since they have a tendency to wind up all around the house.

Photobucket


Now that you've seen the details, let's take another step back and appreciate this room's total transformation!

Before:
Photobucket

After:
Photobucket

Before:
Photobucket

After:
Photobucket

(Please try to ignore the air conditioner... yes, we left it in all winter. Yes, we were too busy/lazy to take it out. If you read this blog regularly you see all the stuff we've got going on, so cut us a break on that one pleaseandthankyou!)

Way back when we closed on the house, I had posted this inspiration picture for what I had in mind for the room:


Obviously our bedroom ended up very different than this, but I did stick with the original color scheme that I had planned back then.

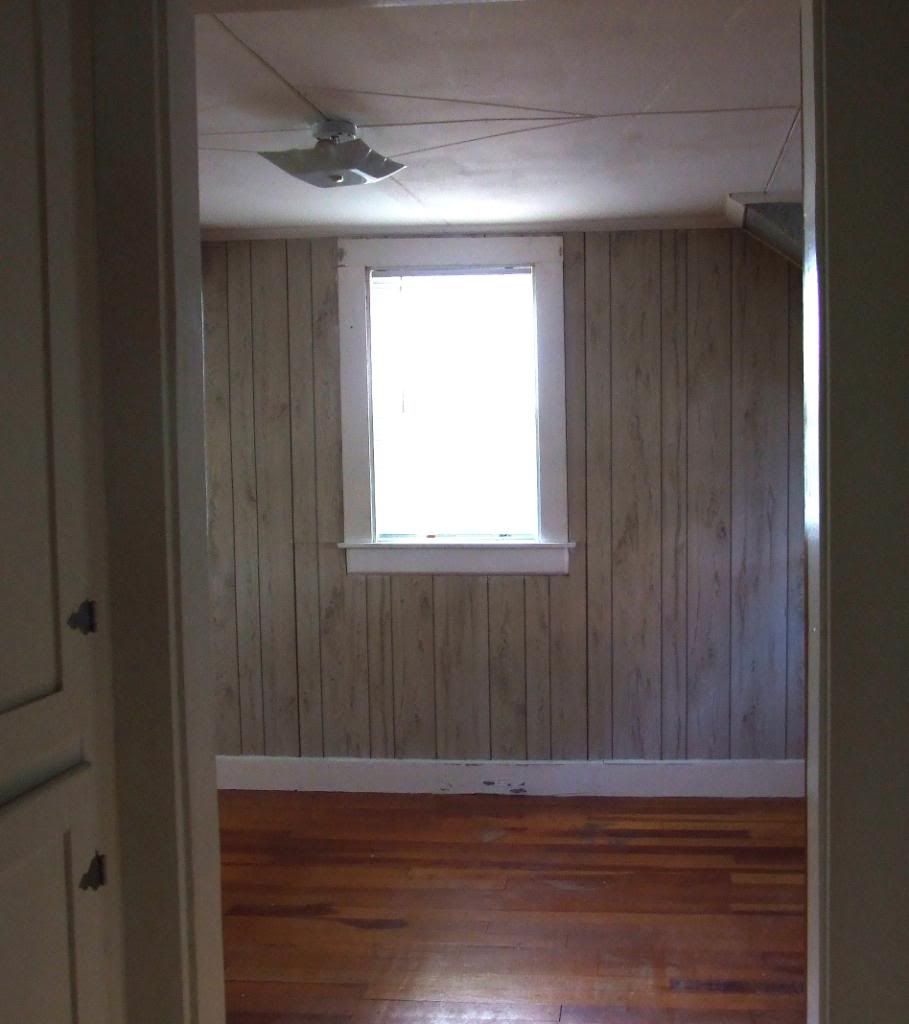
Here is another view, looking into the bedroom from the hallway.

Before:
Photobucket

After:
Photobucket


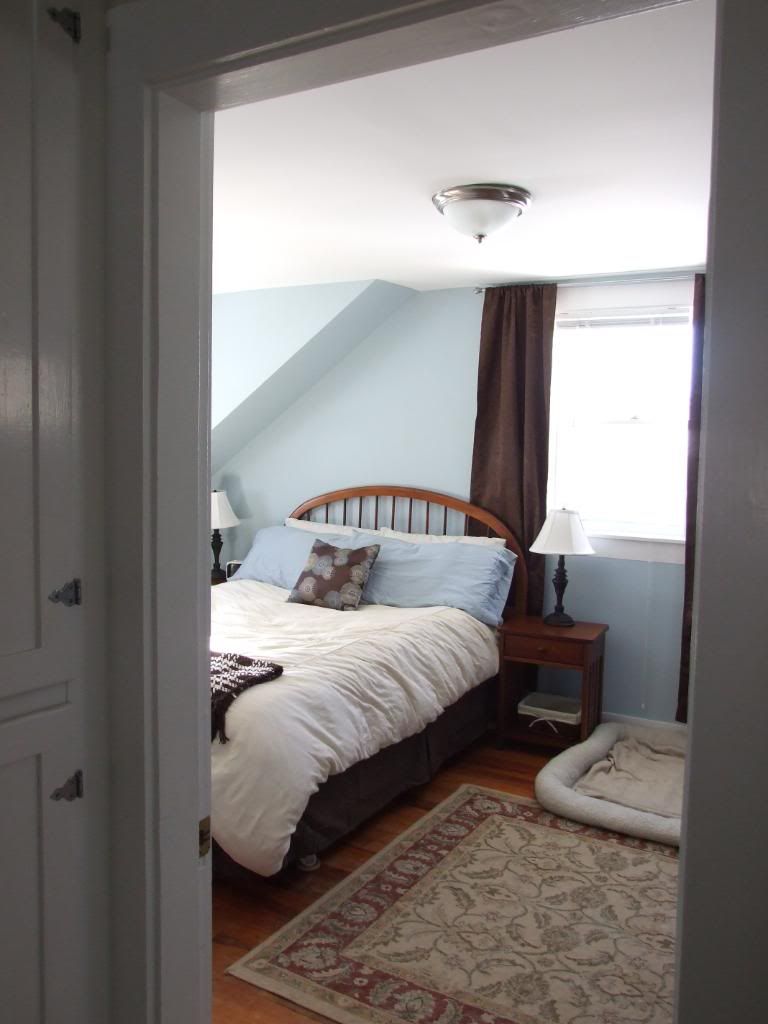
Pretty amazing, no?? It makes me so happy to see how far we've come since we closed in June! I just love looking at the difference between those hideous ceiling panels with weird designs, and the clean and modern ceiling we've got going on in there now. Happy sigh.

There are still some tweaks to be made, like replacing that area rug for example. I'm on the hunt for something that works and that is affordable (seriously, whyyy are rugs so expensive??), and I'll keep you all updated on that venture!

So what do you think? Pretty good transformation, right? I'll work on another total transformation post for another room soon!

Tuesday, February 8, 2011

A winter casualty

Last night, we had snuggled onto the couch after dinner to watch an episode of the amazingly hilarious An Idiot Abroad (seriously, if you haven't watched it, do it. Karl Pilkington is the funniest, most genius man on the planet... you'll thank me.) Well, only a few minutes into the show we heard the most ginormous crash outside. Branden and I turned to each other and knew exactly what it was before we even went to the window to look.

Like much of the northeast, we've had crazyyy ice dams on our roof the last week or so which resulted in two leaking windows. Nothing major, but we called a few companies yesterday to get estimates on what it would cost to have someone come and clear the ice and snow from our roof. Well, that won't be necessary now.

The gigantic crash was about 1,000 pounds of ice sliding off of the roof at once and plummeting down to the patio in the backyard.

Photobucket

Those are just some of the blocks. For some reference, that folding table in the back is 6 feet long. They're ridiculously heavy and huge. Branden struggled to move them with a shovel.

While we are so grateful that no one was outside when it happened, especially Lucy (who has taken to laying down under the roof's edge to eat fallen icicles), our glass patio table was not so lucky.

You can hardly see it, but the table has been smashed into a zillion tiny shards of glass, mixed in with the snow and ice:

Photobucket

This spurred an emergency trip to (where else?) Home Depot. We couldn't risk Lucy walking around in there and stepping in glass, so we had to section it off quick.

We picked up some stakes, traffic cones, and temporary fencing. At the checkout, the clerk asked us if we were buying supplies for an elaborate prank. I wish!

So here's the hazard zone that our backyard is now:

Photobucket

Photobucket

It ain't pretty. We had to use cones there because we wouldn't be able to get the stakes through the concrete patio underneath. Lesson learned: nothing is being stored against the house next winter.

The absolute worst part is that it'll have to stay like this until the 3-4 FEET of snow melts and we're able to clean up the glass. At least we'll get to shop for a new patio set in a couple of months. :)

Dear Spring,
Any time you want to arrive I know of some folks here in NH who would greatly appreciate it.
Sincerely,
Lucy's House